NuvlaEdge Device Host Management
The NuvlaEdge software is designed to be reliable and resilient. However, since it is itself running as containerised micro-services, it is dependent on the underlying container technology, including the container orchestration engine. This is why we created the NuvlaEdge Device Host Management feature. This optional feature runs on the host operating system and provides a last resort ability to intervene on the edge device in case of issues. It can also be used to maintain the underlying operating system if required.
The NuvlaEdge Host-level Management feature, can be enabled at any time, for any NuvlaEdge, offering device management redundancy through an additional management channel for your NuvlaEdge devices, which exists and sits outside the working environment of the NuvlaEdge micro-services.
Enabling host-level management
IMPORTANT: to enable this feature, you must be logged into your edge device!
Host-level management is optional, and is disabled by default. If you wish to enable it, you can do it at any time during the lifecycle of your NuvlaEdge (including at creation time), and you only need to do it once.
After enabling it, you’ll be given a single-line instruction that you must copy and paste into your edge device’s crontab. Here’s an example of how to set it up:
- enable host-level management and obtain the single-line instruction from Nuvla.io, either during or after the NuvlaEdge creation (see the details down below)
- copy the given instruction
- log into your edge device, either as
rootor as the user used to install the NuvlaEdge Engine - type
crontab -eand press enter (you might be asked to choose an editor - in this example, we usevim) -
scroll to the end of the window, press
a(if usingvimmode) and in a new line, paste the copied instruction. You’ll end up with something similar to this:# Edit this file to introduce tasks to be run by cron. # # Each task to run has to be defined through a single line # indicating with different fields when the task will be run # and what command to run for the task # # To define the time you can provide concrete values for # minute (m), hour (h), day of month (dom), month (mon), # and day of week (dow) or use '*' in these fields (for 'any').# # Notice that tasks will be started based on the cron's system # daemon's notion of time and timezones. # # Output of the crontab jobs (including errors) is sent through # email to the user the crontab file belongs to (unless redirected). # # For example, you can run a backup of all your user accounts # at 5 a.m every week with: # 0 5 * * 1 tar -zcf /var/backups/home.tgz /home/ # # For more information see the manual pages of crontab(5) and cron(8) # # m h dom mon dow command * 0 * * * export NUVLABOX_API_KEY=credential/9a460aeb2-67bc-4f36-bd71-dfef18bfc1a6 NUVLABOX_API_SECRET=52UdVXf.5EsMeH.gM3Wzv.32eqJ2p.pVKYNe NUVLA_ENDPOINT=https://nuvla.io && curl -X POST ${NUVLA_ENDPOINT:-https://nuvla.io}/api/session -H content-type:application/json -c /tmp/nuvla-cookie -d "{\"template\": {\"href\": \"session-template/api-key\",\"key\": \"$NUVLABOX_API_KEY\", \"secret\": \"$NUVLABOX_API_SECRET\"}}" && curl -X POST ${NUVLA_ENDPOINT:-https://nuvla.io}/api/nuvlabox/0ab3124f-30b4-4660-a2e4-d9e4fa63b3fe/assemble-playbooks -b /tmp/nuvla-cookie | sh - - exit the crontab editing window by pressing (if using
vim)esc, followed by:,xandenter. Your terminal window should print the following message:crontab: installing new crontab
And you’re done. Once you’re NuvlaEdge has been installed and is activated in Nuvla.io, your instruction will start successfully running periodically (every hour by default), executing whatever NuvlaEdge Playbooks are associated with your NuvlaEdge, and reporting the results back to Nuvla.io and onto your NuvlaEdge page.
NOTE: please note that the single-line instruction you are given contains an API key with management access to your NuvlaEdge, so please make sure you don’t share this instruction with untrusted parties.
At NuvlaEdge creation time
From Nuvla.io, proceed to create a new NuvlaEdge as usual.
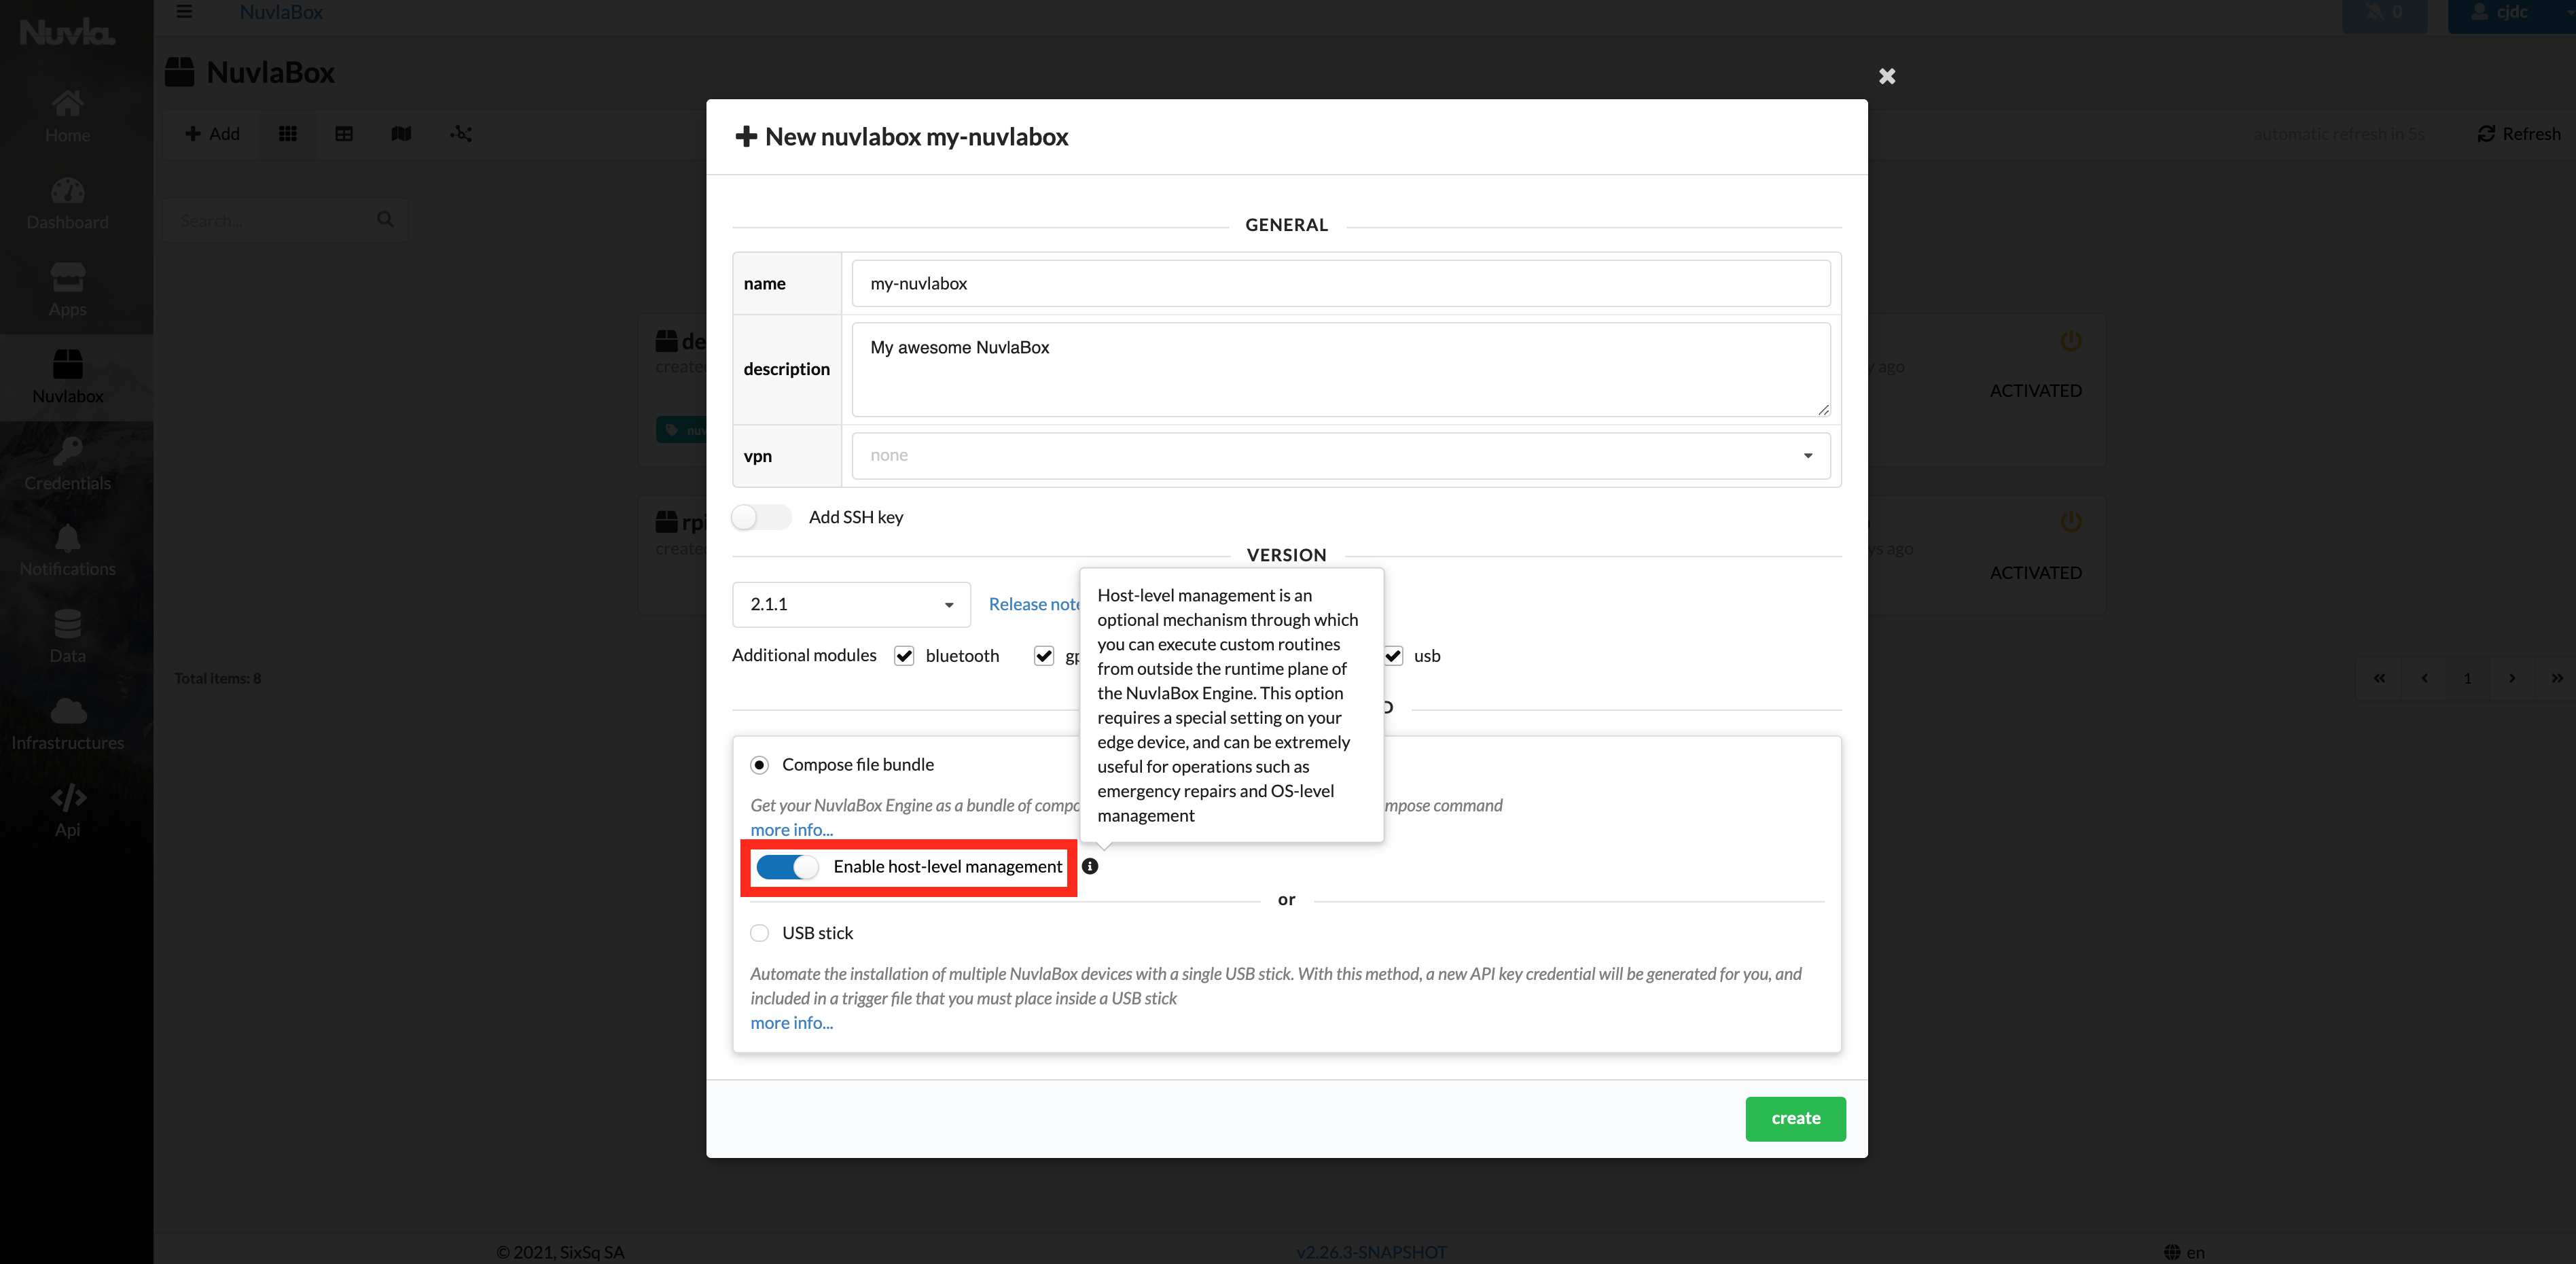
When selecting the Compose file installation method, make sure you can opt-in to have the host-level management feature enabled. If you create the NuvlaEdge with this option enabled, you’ll see this:
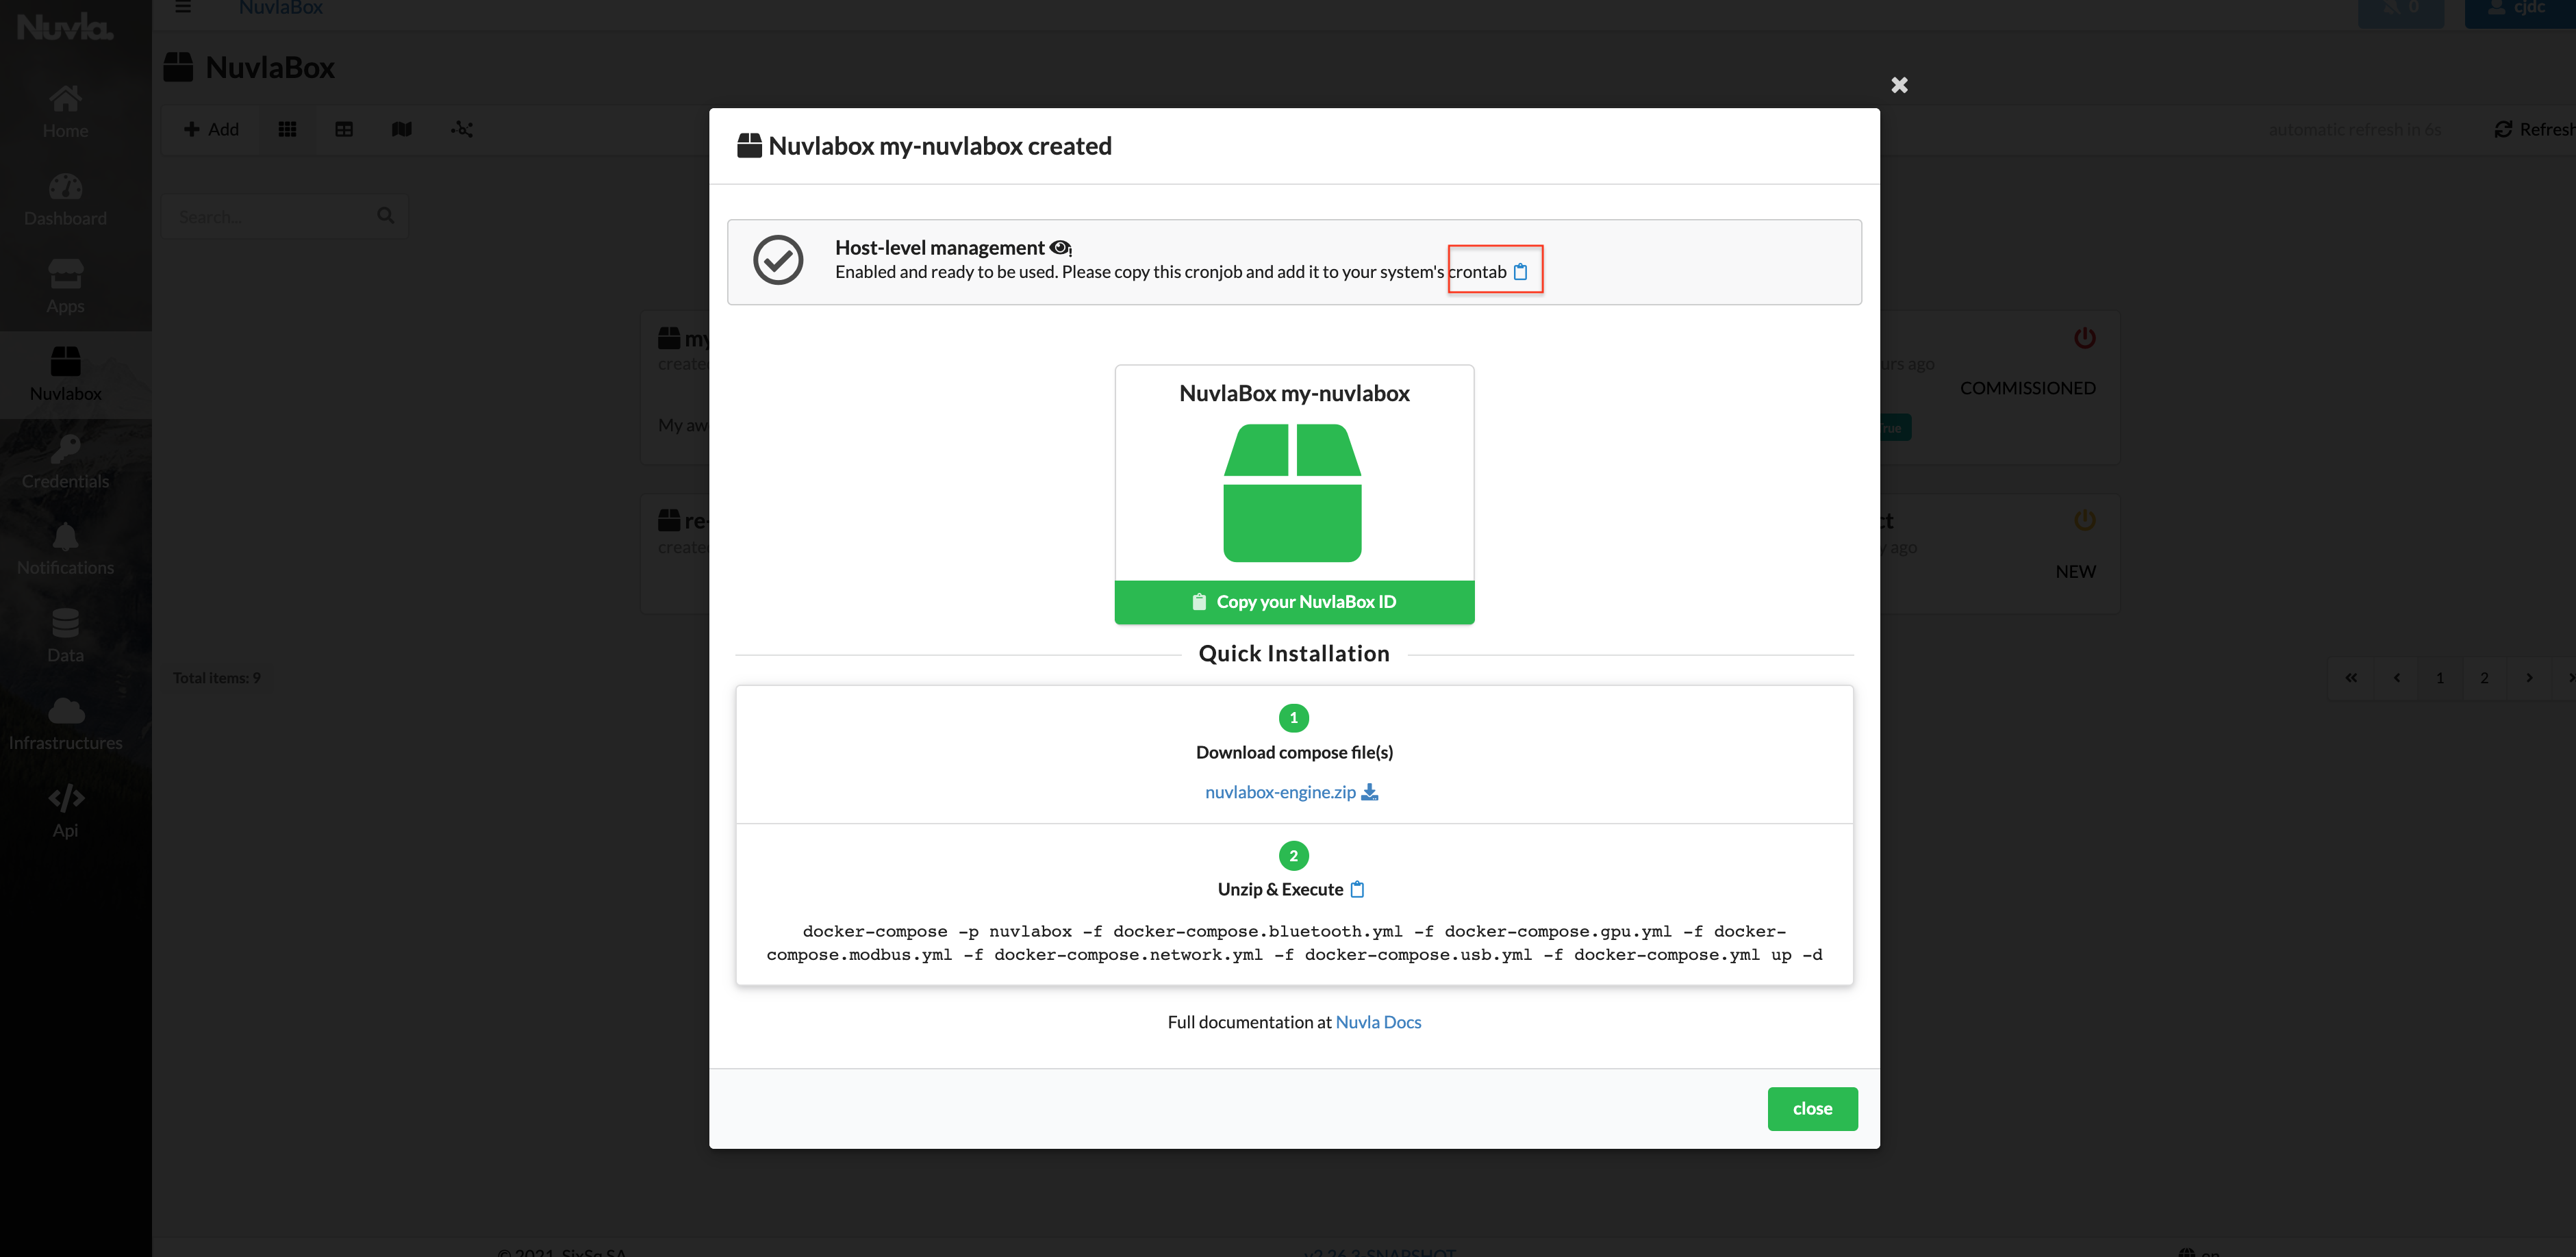
From here, use the “Copy to clipboard” icon to copy your single-line instruction to be pasted in your Edge Device’s crontab (as explained above).
After the NuvlaEdge has been created
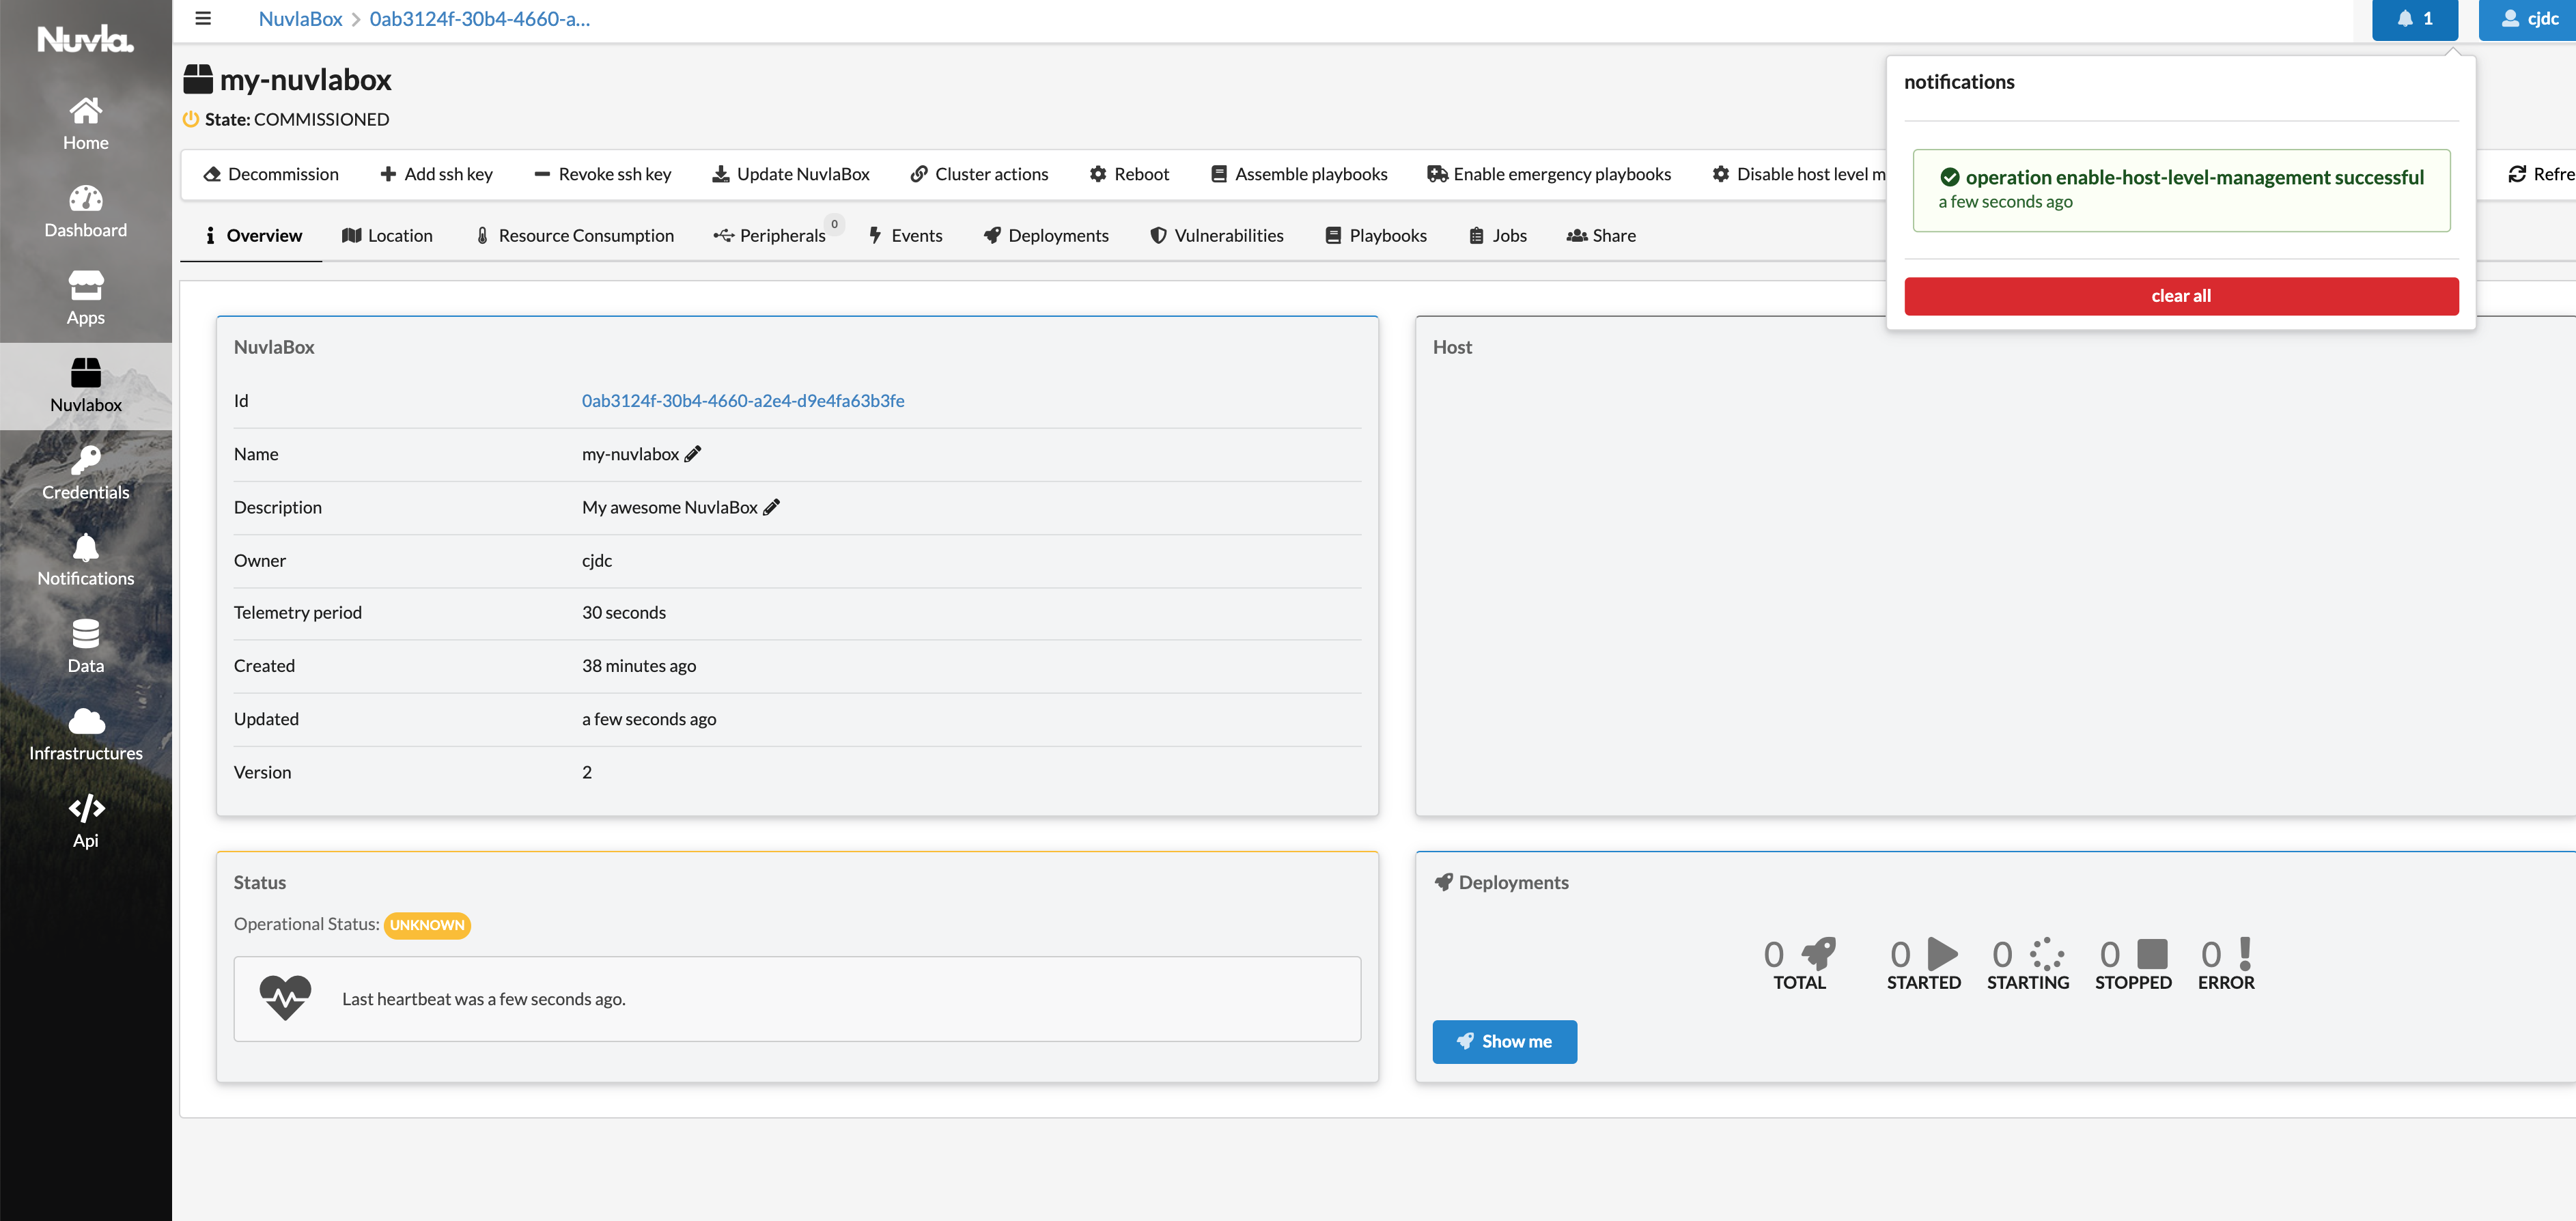
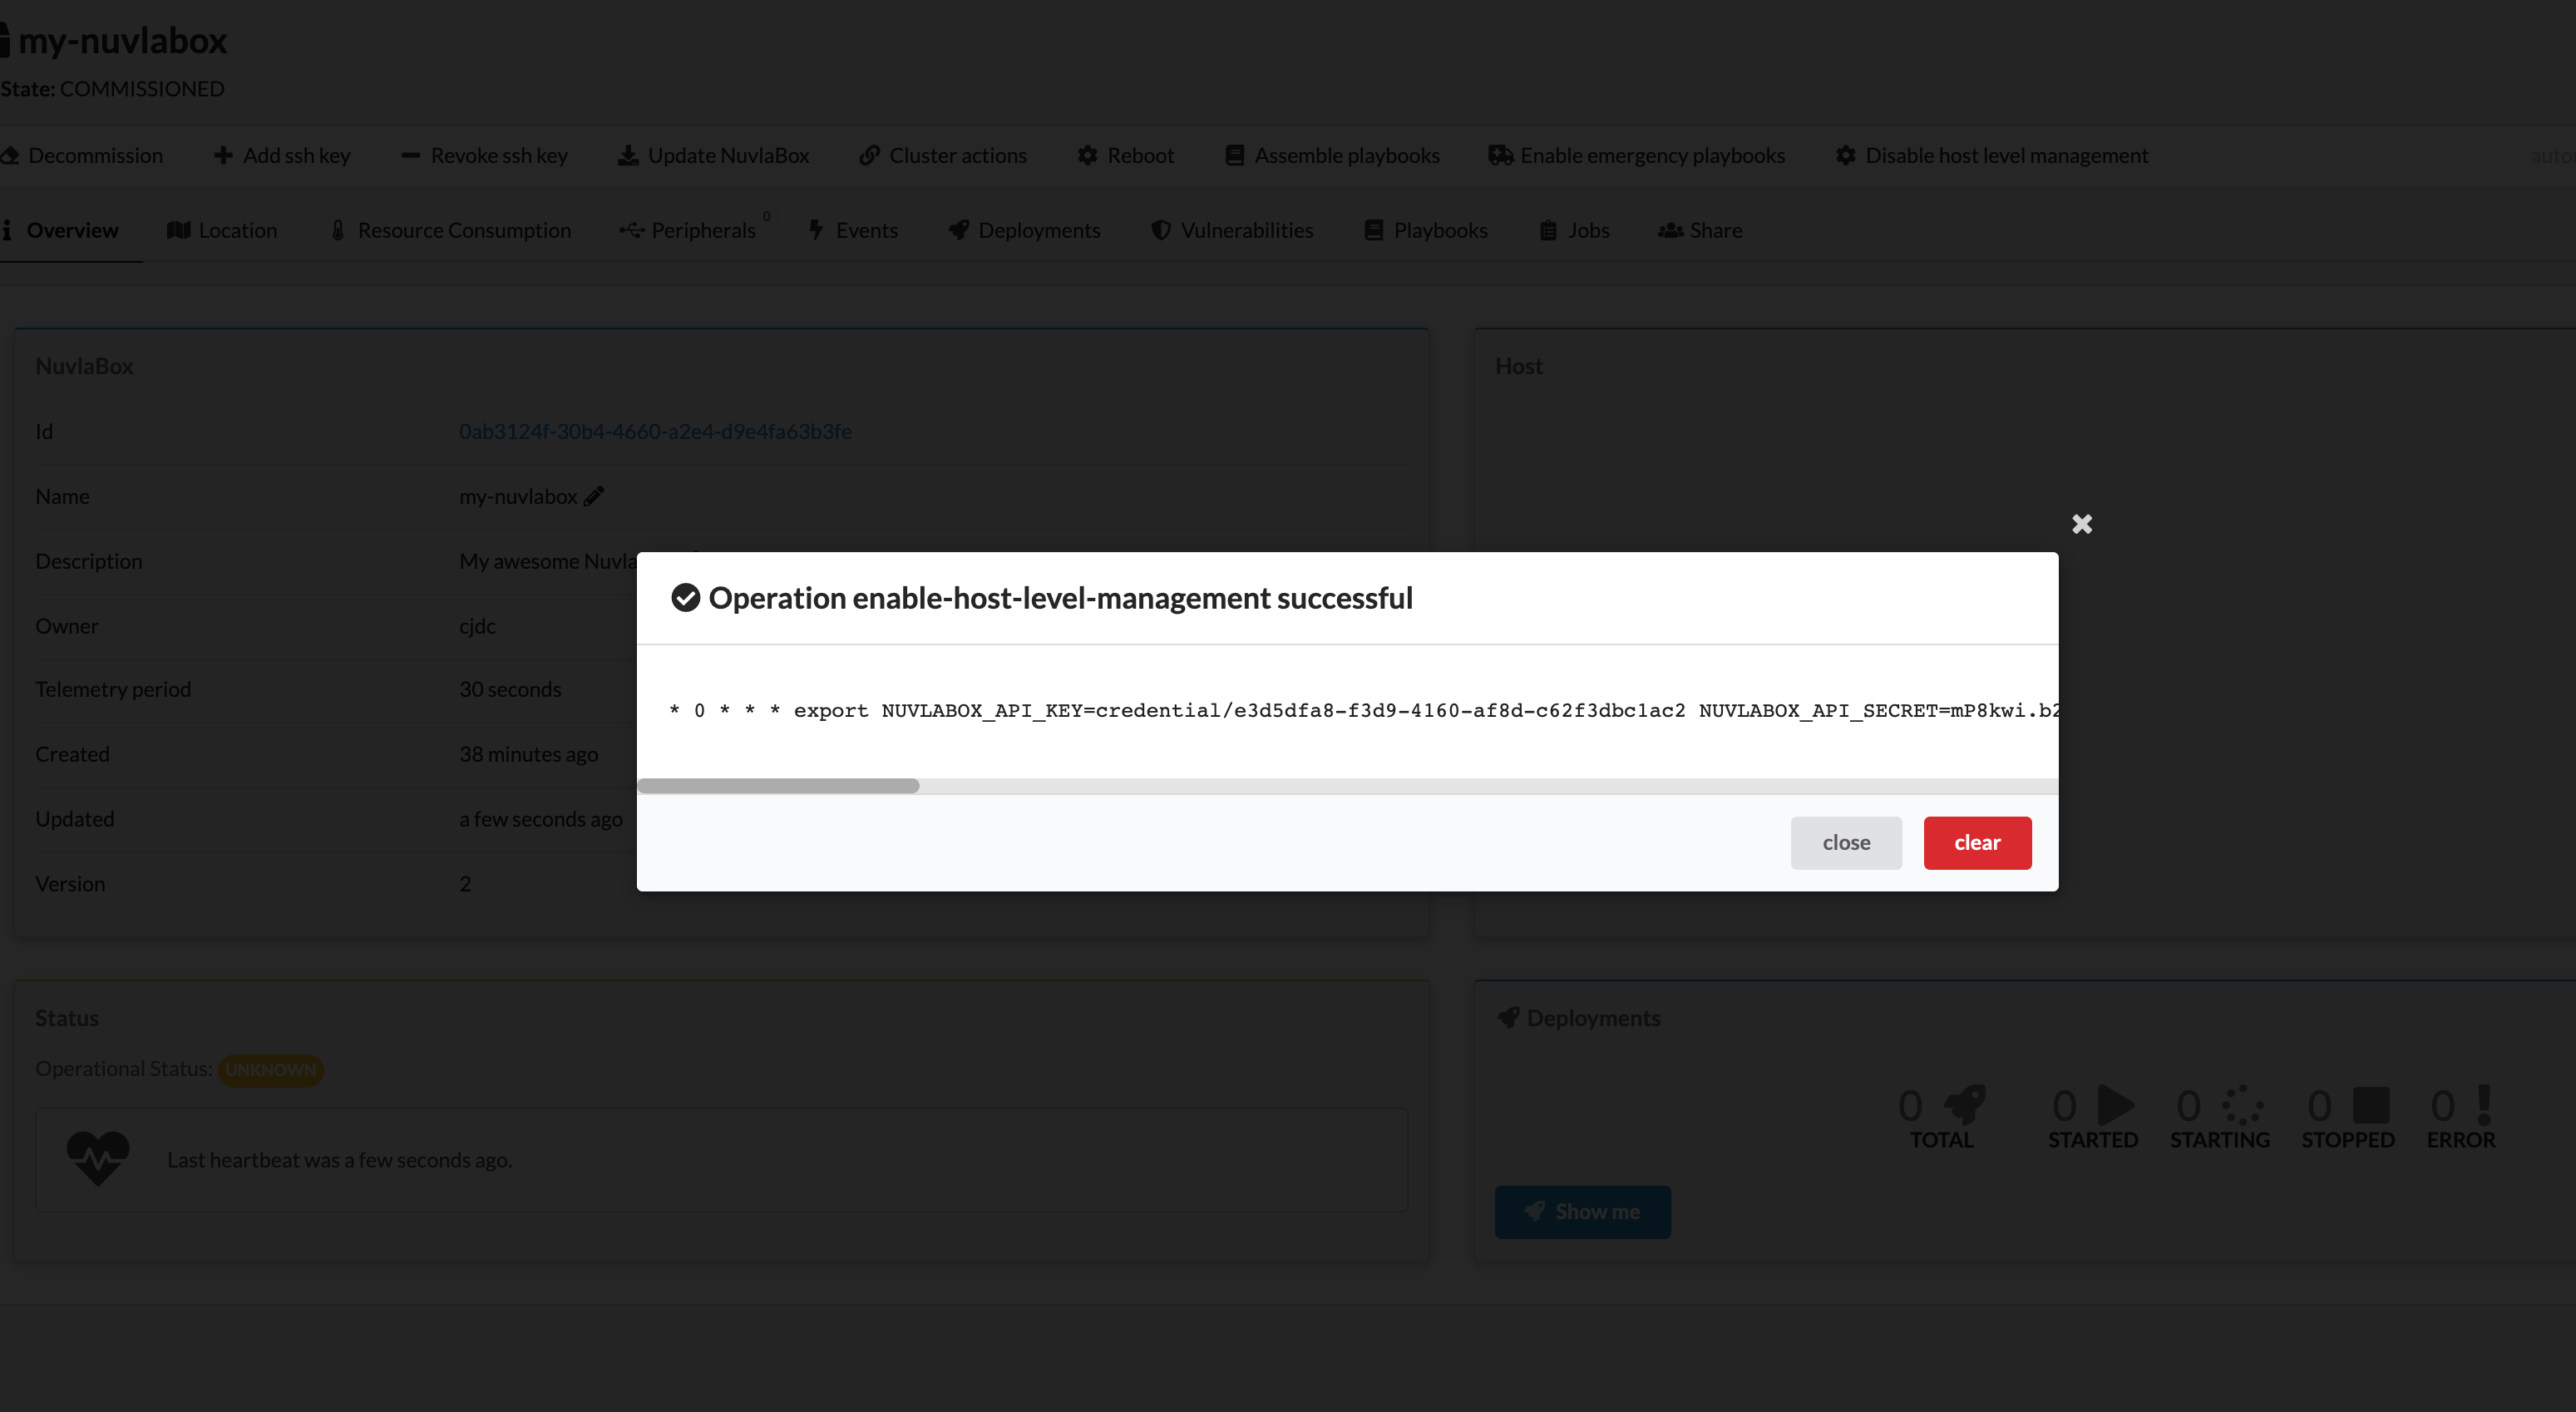
From Nuvla.io, navigate to your NuvlaEdge page, and in the menu bar you’ll find an action called “Enable host level management”:
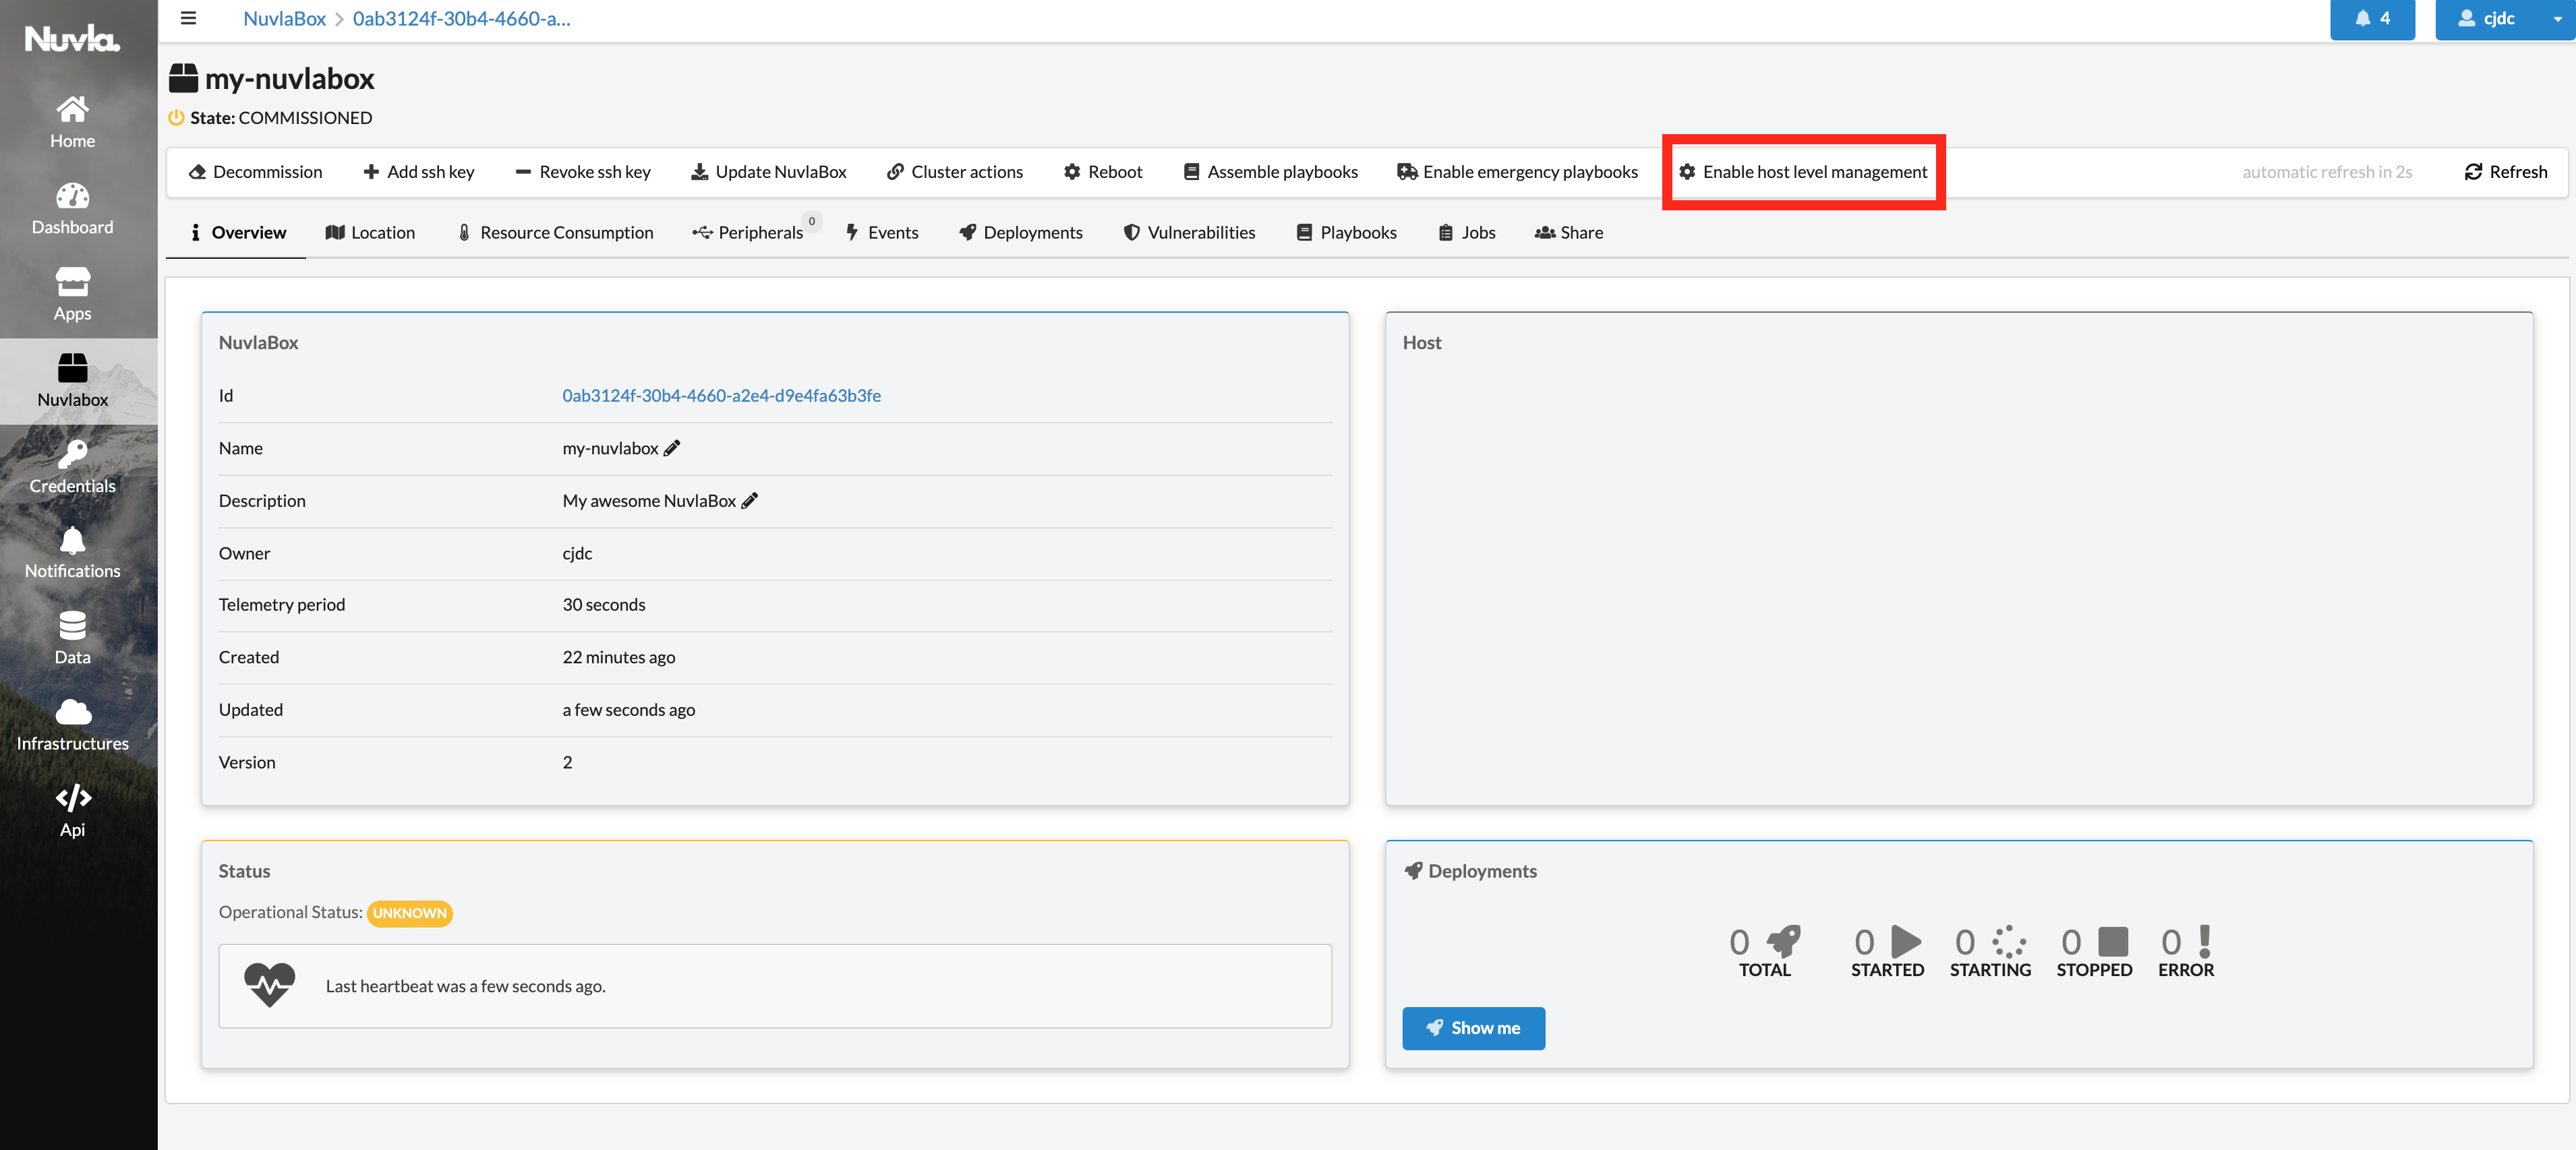
Click on this actions and once you’ve enabled it, you’ll see a new notification on the top right corner. Open it, and you’ll find the single-line instruction that you need to copy and paste in your Edge Device’s crontab (as explained above).
Managing NuvlaEdge’s host via Playbooks
The NuvlaEdge Playbooks (aka the nuvlabox-playbook resource) is an API resource which lets users define scripts to be executed in their NuvlaEdge device through the host-level management feature. As you might have noticed from the explanations above, the host-level management feature roughly translates into a system-wide cronjob that you must setup in your edge device. This cronjob consists of a single-line instruction which uses your NuvlaEdge identity to ask Nuvla.io to assemble all the playbooks associated with your NuvlaEdge. The cronjob then runs them one by one, sending their respective output back to Nuvla.io.
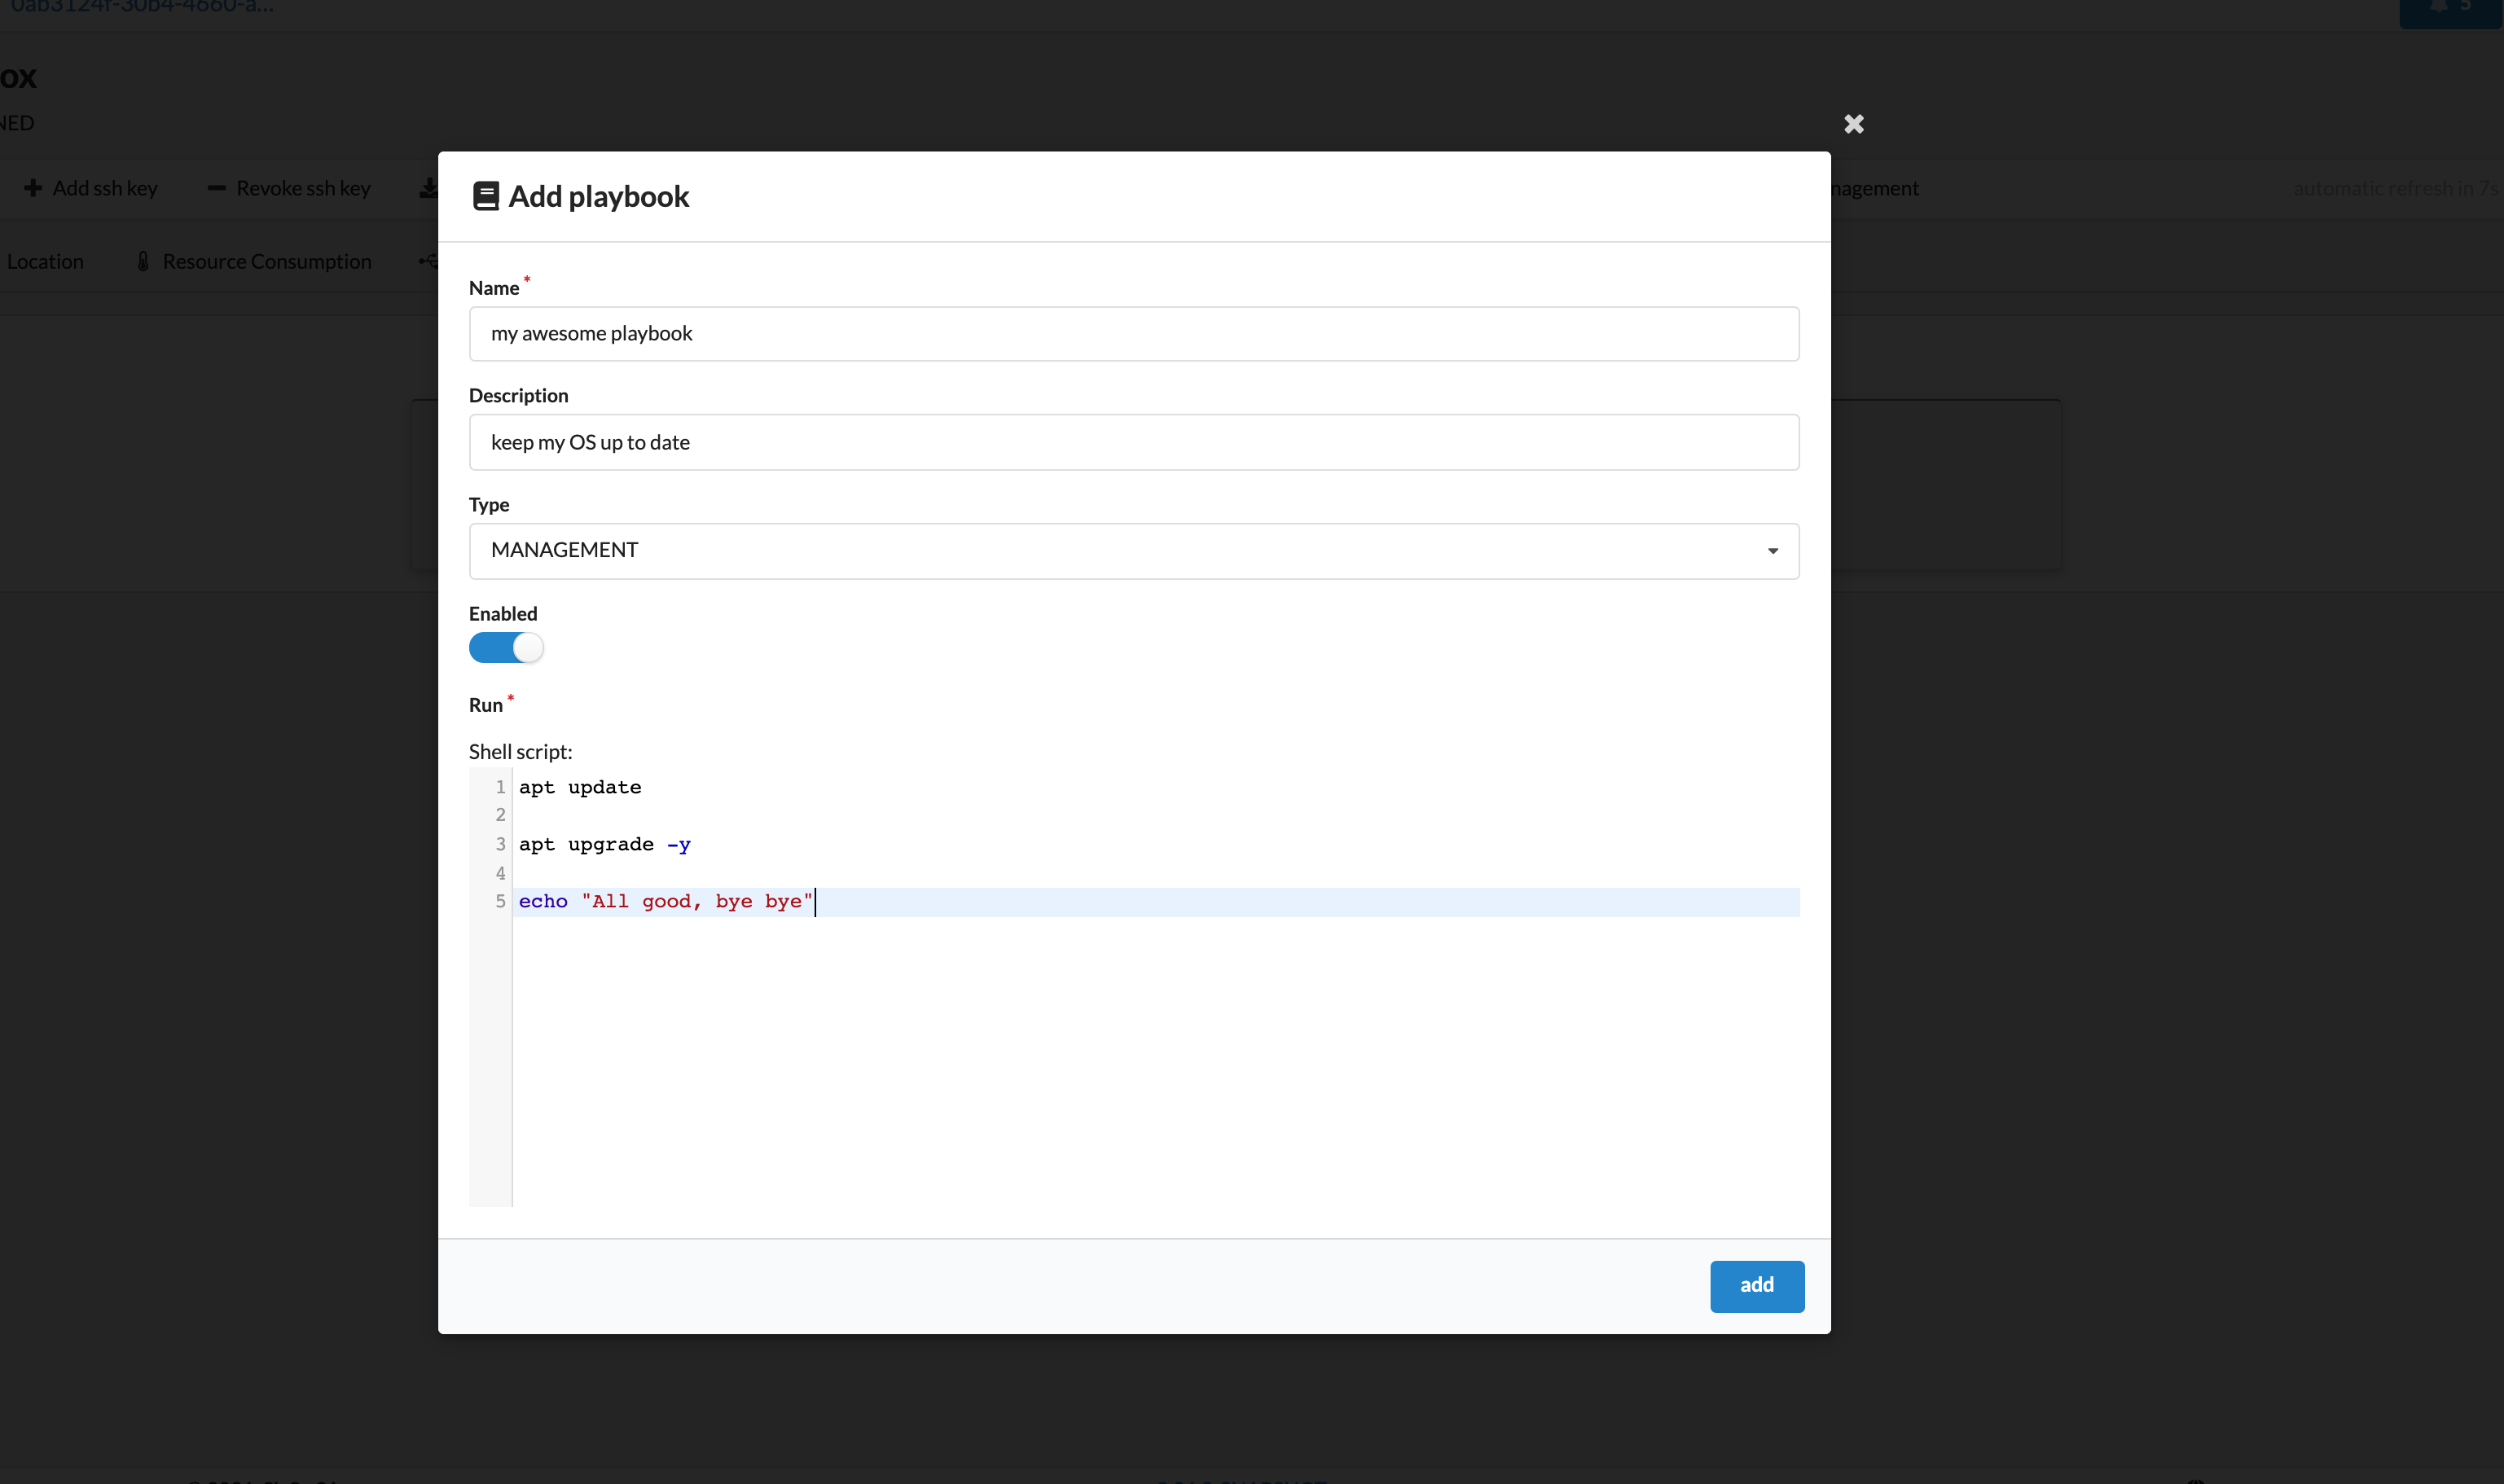
NuvlaEdge Playbooks have the following structure:
{
  "name": str,                    # [optional] name of your playbook
  "description": str,             # [optional] playbook description
  "type": MANAGEMENT|EMERGENCY,   # type of playbook
  "parent": nuvlabox/uuid,        # ID of the NuvlaEdge where this playbook must run
  "enabled": bool,                # whether the playbook should run or not
  "run": str,                     # shell script to be executed on the edge device
}
You can have two types of Playbooks:
- MANAGEMENT: these are playbooks that contains management scripts. When enabled, these playbooks are executed on every host-level management cycle. We recommend you use these playbooks for doing periodic maintenance and monitoring of your edge device (i.e. checking the health of certain OS services, installing/upgrading OS packages, etc.),
- EMERGENCY: these are one-off playbooks, that are only executed on-demand and should only be used to perform emergency repairs or recover from a disaster. Once enabled, these playbooks become available for execution on the edge device, and once they are requested by the edge device, they are automatically disabled by Nuvla.io (thus their one-off nature).
Creating NuvlaEdge Playbooks
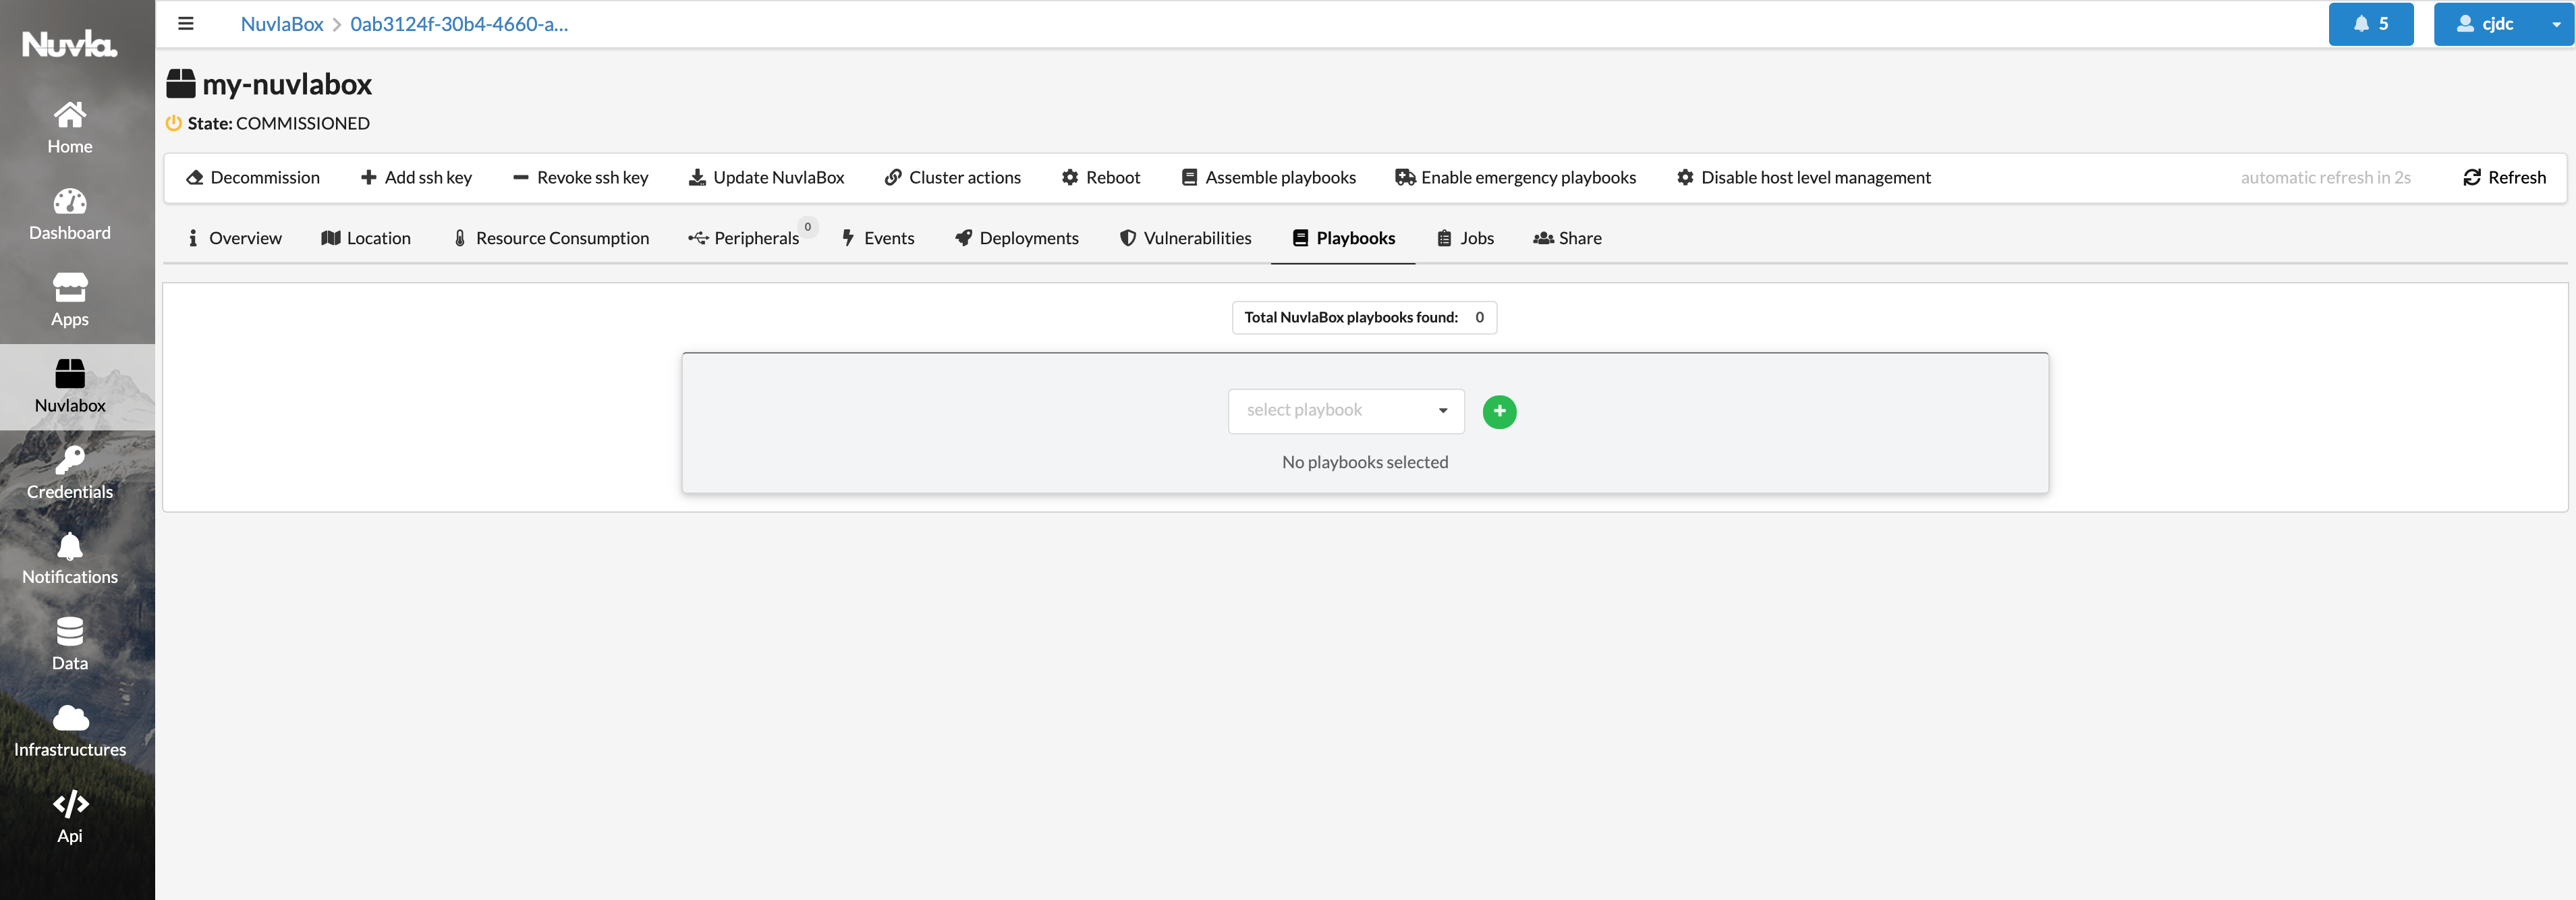
From Nuvla.io, navigate to your NuvlaEdge page, and select the “Playbooks” tab:
To create a new playbook, click on the “plus” button:
Once created, your playbooks will then appear in your NuvlaEdge’s Playbook tab:

And you can edit each script and enabled them directly from the NuvlaEdge page.
Monitoring the NuvlaEdge Playbooks’s output
Once created and enabled, your playbooks will become available for execution. Therefore, the next time your host-level management cycle occurs, the playbook is executed on the edge device and its output will be automatically sent to Nuvla.io, and will appear under its corresponding NuvlaEdge page.
Enable an Emergency repair
In the unlikely event your NuvlaEdge becomes unresponsive or unreachable, you might want to run a recovery script. This is what Emergency Playbooks are for. To enable an emergency repair, you must first have created one or more playbooks of type “EMERGENCY”.
Then, from your NuvlaEdge page, click on the “Enable emergency playbooks” action (on the menu bar):
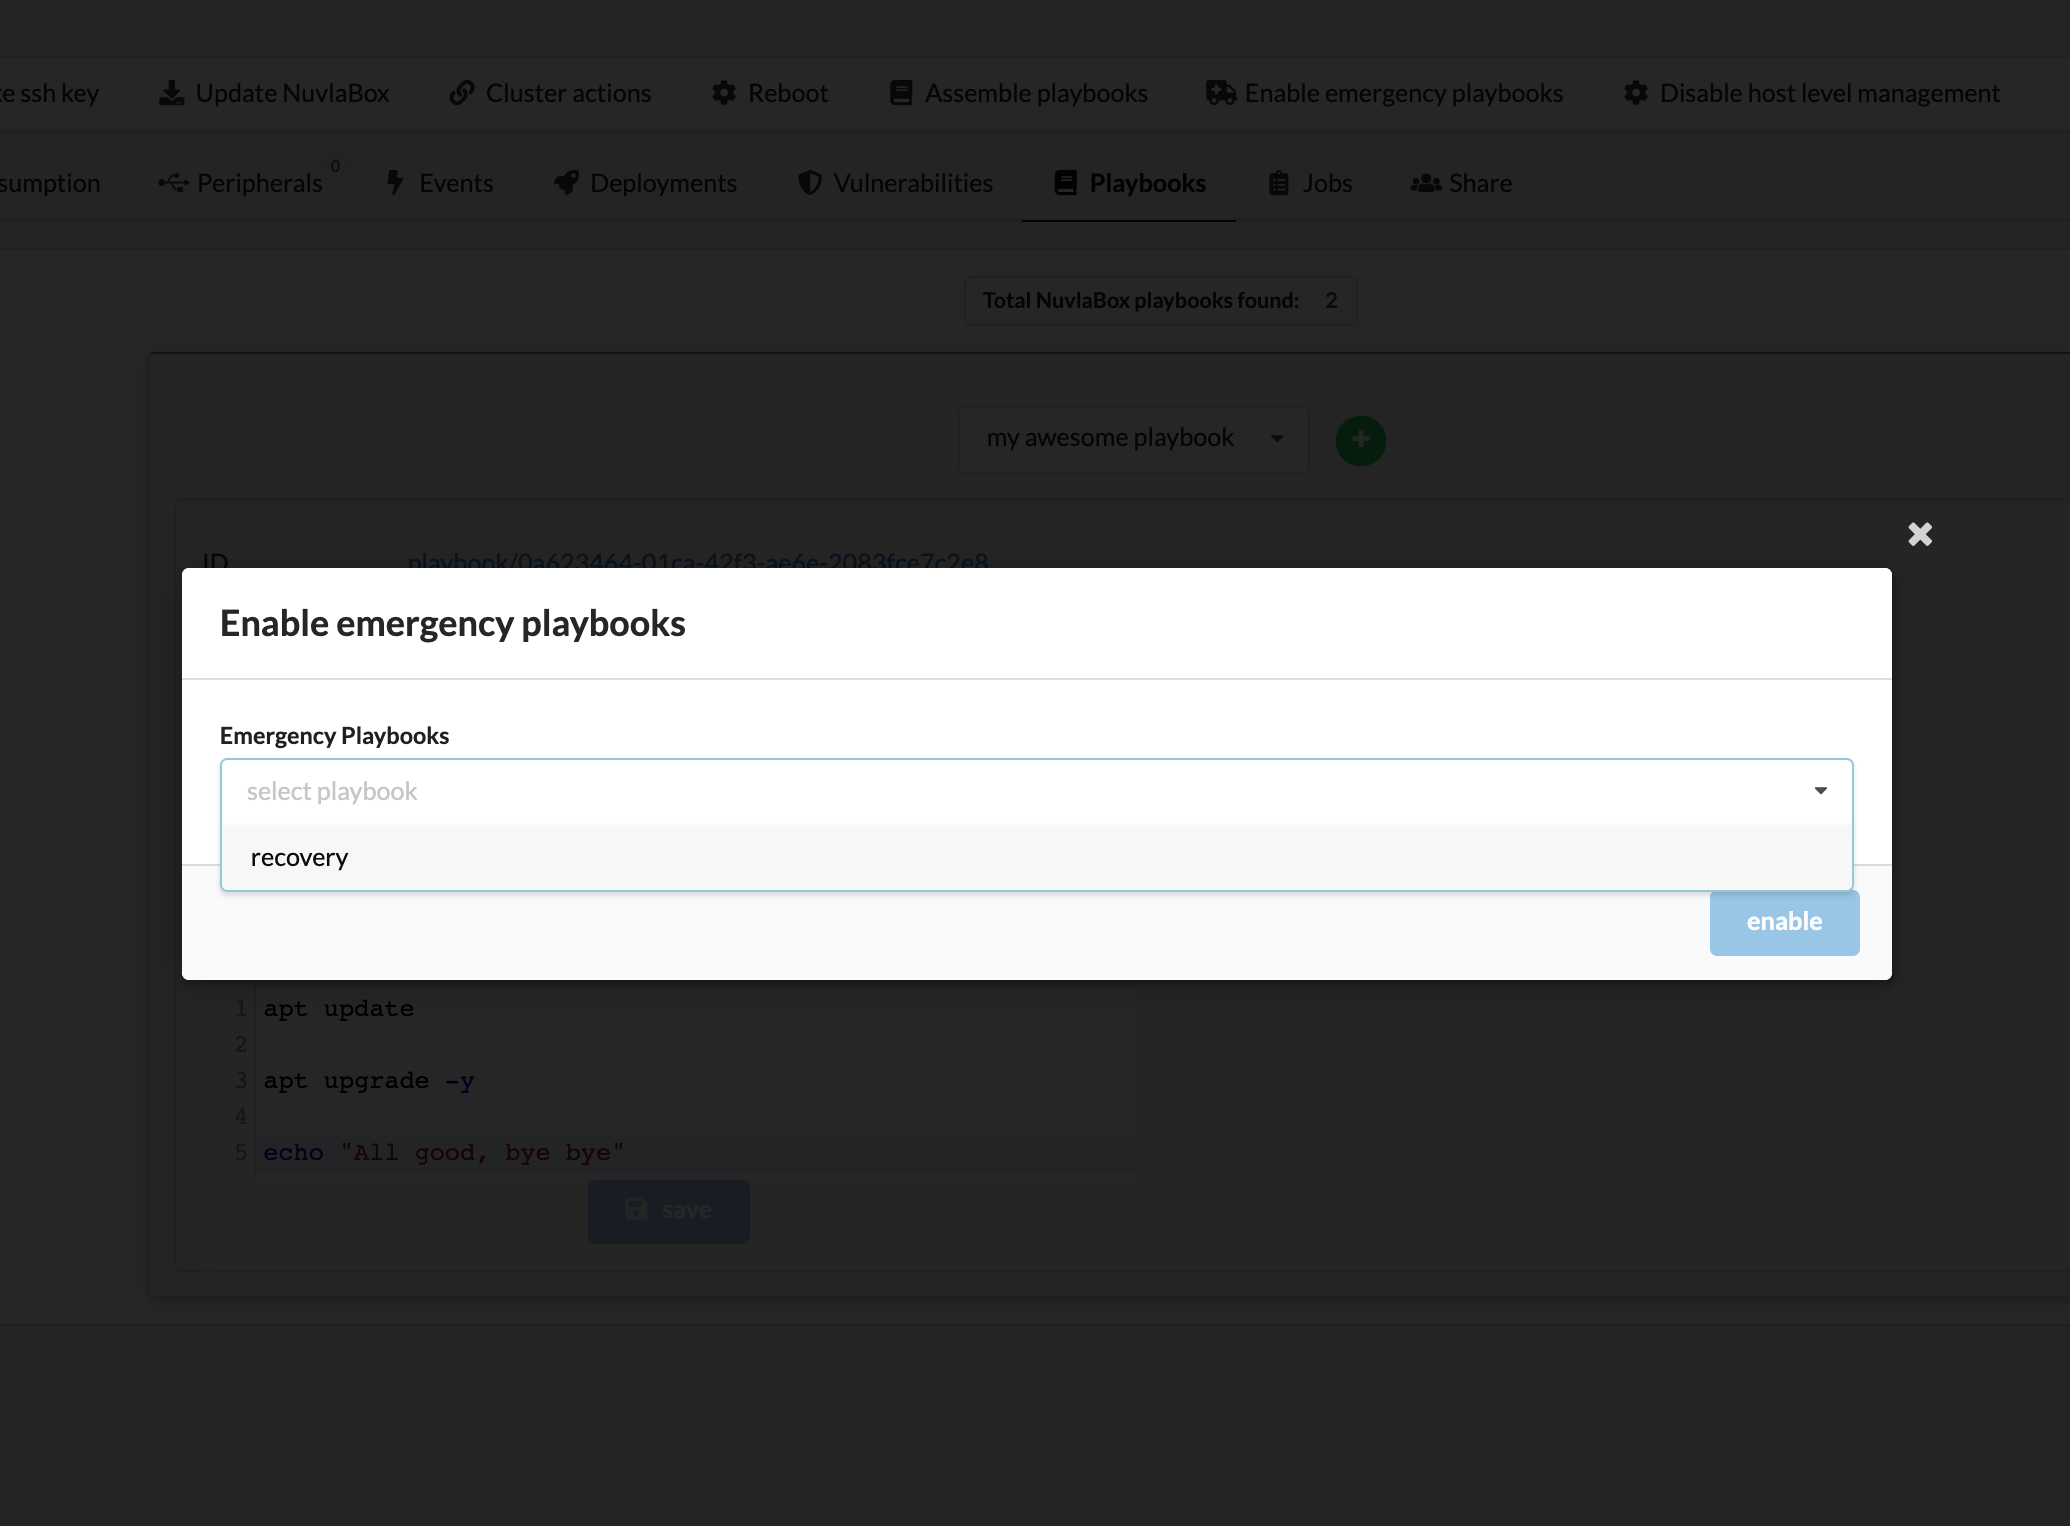
And choose the emergency playbook(s) you want to enable.
Then simply wait for the next host-level management cycle. Your emergency playbooks will be picked up by your NuvlaEdge edge device (instead of the regular “MANAGEMENT” ones), executed, and then disabled again.
Bonus Playbook tip
As a user, you don’t really need to use this NuvlaEdge operation, but in case you’re interested, you can inspect the actual scripts your host-level management cronjob is executing on every cycle, by calling the action “Assemble playbooks” from your NuvlaEdge page:

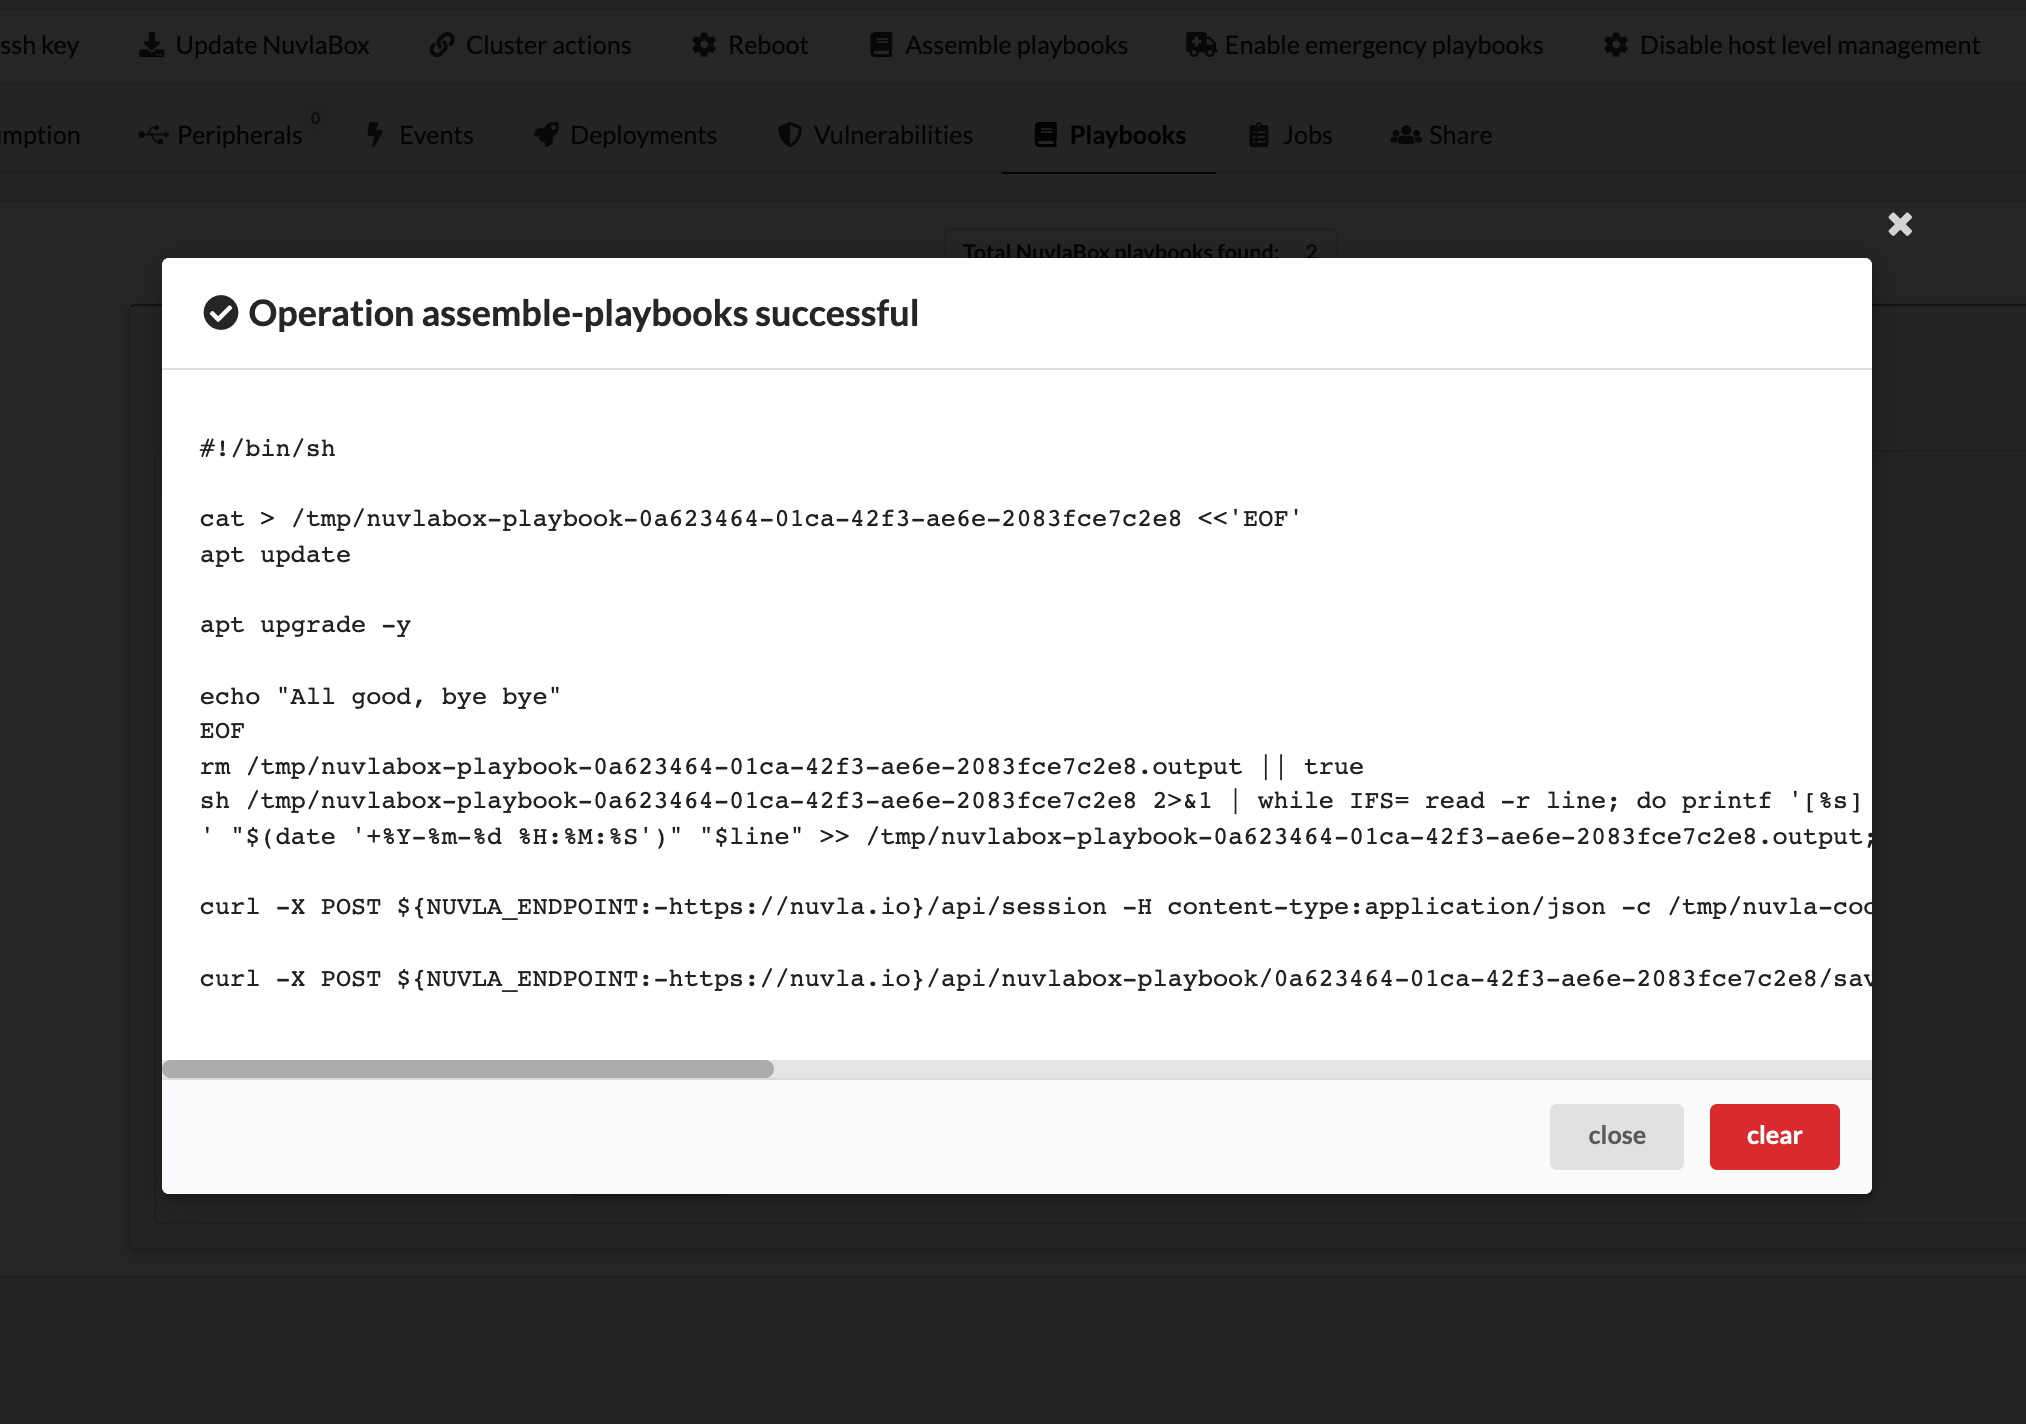
This way you can keep tabs on what your host-level management mechanism is doing, and you can even reproduce it manually in case you want to debug your own playbook scripts.
NOTE: remember not to call this
assemble-playbooksoperation when you’ve enabled the emergency playbooks, as it will cause these playbooks to be disabled after the operation succeeds.